- 求职面试导航
- [大数据测试]ETL测试工具和ETL面试常见的问题及答案
- 面试官考的MySQL 原理
- MySQL8.0版本升级建议及各种场景的操作
- 面试遇到不会的问题,该怎么巧妙应对?
- 面试一题:如何通过sql方式将数据库表行转列?
- 搞透这 20 道,SQL面试就没问题了
- SQL面试复习的高级部分
- SQL面试复习-基础部分
- SQL面试复习-高级部分
- docker运行mysql并数据持久化
- 学了半年SQL,她从咨询公司跳槽去当商业分析师
- 【数据分析岗】面试框架梳理
- MYSQL另类利用方式
- SQL练习题和答案(MySQL版)精选
- Mysql和Mongodb面试题
- 在Centos上如何修改密码
- 数分面试中应该知道的5个SQL日期函数
- 外企一道 SQL 面试题,难倒494人!
- mysql 查询优化执行过程
- 网络安全--SQL注入介绍
- 【案例实操】数分面试必知必会的SQL窗口函数
- Mysql之事务篇
- 【案例实操】面试必知必会的SQL窗口函数
- mysql主从切换
- mysql随手记-我没有被面试官“锁”住
- MySQL中MGR中SECONDARY节点磁盘满,导致mysqld进程被OOM Killed
- 测试开发必备:SQL 语法速成手册,yyds!
- 面试无数次总结出MySQL3万字面试题
- mysql命令 详细整理,web开发教学
- MYSQL中锁的各种模式与类型
- MySQL连接控制插件介绍
- SQL笔试题深析
- MySQL 定时备份数据库(基本全)
- 笔试中会碰到书写sql语句的题目(面试题)
- 高频数据库 MySQL 面试题
- 如何解决MySQL数据字典提示1146不存在的问题
- 【数据分析岗】面试高频类型——大数据技能
- MySQL连表查询
- 大厂招聘必问面试题-数据库
- MySQL主从之外,你又多了一项选择,Galera
- SQL测试必备命令和语法教程在这儿!
- mysql死锁查看具体行
- CentOS 7 rpm安装MySQL 5.6
- SQL面试题,快问快答!
- MySql数据库连接超时处理
- 干货!常见的SQL面试题:经典50例!
- 面试打脸TOP 1!简历写精通SQL,你真的是精通吗?
- SQL中的集合
- 可能会遇到的数据库(MySQL)面试题(含答案)
- mysql 左链接 left join 条件写在where 后面与 on后面的区别
- 为何SQL很受名企欢迎?
- mysql插入中文报错的几种解决方法
- MySQL 面试题
- SQL语句中exists和in的区别
- MySQL 高频面试题,最常问!
- MySQL(六)—— 分组函数(多行处理函数)
- Mysql锁机制面试点总结
- MySQL:介于普通读和锁定读的加锁方式(1),MySQL最全整理
- MySQL 高频面试题!
- 面试 (MySQL 索引为啥要选择 B+ 树)
- 设置mysql免密码登录, mysql设置密码
- mysql面试题
- MySQL基础篇之子查询概述
- 记录第一次面试
- MySQL5.7半同步复制
- 面试总结,MySQL 中 int (10) 和 int (11) 到底有什么区别?
- MySQL抓包工具:MySQL Sniffer
- Mysql,我为了面试准备的
- 老板:让你添加一个mysql用户并给予权限这么费劲吗?
- Mysql面试题精选
- MySQL 数据库基础知识点复习
- Java面试,面试题
- 面试官:了解数据库连接池吗?
- MySQL主从复制那些事
- 【Mysql】初识MySQL
- mysql5.7 innodb数据字典
- mysql集群搭建教程-mysql+windows篇
- Mysql数据库导入导出
- 面试题:内存型数据库Redis
- MySQL面试之灵魂拷问
- Mysql数据库日志
- MySQL的底层原理
- MySQL 8.0的新特性-克隆插件
- 面试被问 | 数据库连接池为什么要用threadlocal呢?
- Java面试之MySQL
- 浅谈 MySQL 的临时表和临时文件
- MySQL为什么varchar字段用数字查无法命中索引,而int字段用字符串查却能命中?
- mysql面试之ORM
- MySQL 那些常见的错误设计规范
- 面试超过1000人的资深HR亲诉:如何有效回答数据分析面试问题?
- MySQL 十大常用字符串函数
- 面试必备:聊聊什么是数据库范式?
- 如何将tableau与mysql连接起来
- 如何有效回答数据分析面试问题?
- MySQL一条SQL语句执行过程,讲得通俗易懂!
- BAT数据分析面试过程详解
- MySQL 体系架构简介
- MySQL面试题:数据库读写分离
- MySQL自动删除历史数据
- 数据库面试题-Oracle部分
- Mysql各种锁机制(全面)
- MySQL最新面试题题库
- MySQL replace into行为解析
- 橙心优选-数据仓库高级工程师面试
- MySQL 开源工具集合
- 数据工程师面试常见题目汇总
- MySQL外键约束
- 蚂蚁金服:数据仓库高级工程师面试
- 老板:让你添加一个mysql用户并给予权限这么费劲吗?
- 数据分析岗位跳槽面试需要做什么准备
- 如何查看Mysql执行计划
- MySQL面试:数据库自增 ID 用完了会发生什么?
- linux系统下的MySQL 安装及性能测试
- Mysql高级优化(二)
- MySQL架构设计
- 面试!资深数据分析RoadMap
- max_allowed_packet引起MySQL迁移丢失数据的问题
- 美团面试题:MySql批量插入时,如何不插入重复的数据?
- SQL面试:如何快速定位消耗CPU最高的sql语句
- MySQL性能提升40%的AHI功能,你知道么?
- Mysql高级优化(一)
- 数据科学家V.S数据分析师面试全对比
- sql面试:sql中的行转列和列转行
- MySQL面试-基础篇(一)
- 两道常见的MySQL面试题
- MySQL面试-日志录入格式
- 数据分析师也有帮派!四大门派鼎足,你属于哪一派?
- 产品经理必知必会的SQL
- MySQL数据类型-枚举
- MySQL8.0版本选型建议
- 35张图带你 MySQL 调优
- InnoDB从内分析之Row(一)
- 百万级数据库优化
- 数据库常见面试题(三)-缓存与数据库的一致性
- MySQL面试题:MySQL误删数据怎么办?
- 后台JAVA面试-数据库部分(三)
- 什么职位需要使用 SQL_数据处理领域_详解SQL_SQL与NoSQL_什么是NewSQL 数据库
- 后台JAVA面试-数据库部分(二)
- 后台JAVA面试-数据库部分(一)
- 由一个go中出现的异常引出对php与go中操作sql的一些分析
- MySQL事务处理特性的实现原理
- 数据库面试题目集锦
- 如何解决String.hashCode,移植到mysql中时遇到的int溢出问题
- MySQL锁都分不清,怎么面试进大厂?
- Mysql全局锁和表锁
- Innodb存储引擎
- 数据库常见面试题(二)-MySQL分库分表
- MySQL 使用 SQL 语句快速复制表和数据
- 数据库常见面试题 (一)-索引
- MySQL监控第03期:Zabbix 监控 MySQL
- MySQL 监控 第02期:PMM 监控 MySQL
- MySQL 监控 第01期:Prometheus+Grafana 监控 MySQL
- 数据库层面问题解决思路
- MySQL冷备份过程
- innodb 存储引擎下面的MySQL事务
- 分页场景慢?MySQL的锅!
- Mysql触发器
- MySQL 优化笔记
- MYSQL8初始化设置
- MySQL 的共享锁和排它锁以及自动提交
- Ubuntu安装mysql
- 收集一些MySQL常见用法和技巧
- MySQL 慢查询
- MySQL 判断表和数据库是否存在
- 将纯真 IP 数据库导入 MySQL 数据中
- 如何使用 PHP 以发送邮件的方式自动定时备份 MySQL 数据库表数据
- 解决 Navicat 出错 1130-host . is not allowed to connect to this MySql server
- MySQL 服务器无法存 Emoji 表情的解决方案
- CentOS 6.5 部署 Apache-2.4.10 + PHP-5.6.3 + MySQL-5.1.73 + Magento-1.9.1.0
- MySQL 单机双机主从同步复制备份配置
- node-mysql-promise 基于 Node.js 异步操作 MySQL 数据库组件
- MYSQL 常用命令大全整理
- mysqldump 备份恢复数据库
- 数据库和SQL简介
- Python操作MySQL
- mac 安装mysql_mysql启动数据库命令_MySQL Workbench
- 【后台开发面试题】如何分库分表_什么是分库分表_mysql分库分表 中间件_分表逻辑
- 【数据库 的面试】redis缓存一致性怎么保证?redis mysql 缓存方案_mysql缓存机制_redis同步数据到mysql
- 【数据库 面试题】mysql缓冲池_Buffer Pool_LRU缓存淘汰算法_双向链表和单链表的区别
- 【腾讯面试 mysql题目】数据库面试题_mysql处理能力_连接池配置_数据库面经
- 【数据库查询命令】mysql查询当天、本周、上月的数据
- debian下安装mysql
- 还原工具mysqldump_mysqldump备份多个数据库_执行还原操作_导出表
- Centos7 yum 方式安装 Mysql_centos安装mysql客户端
- docker安装mysql5.7_docker部署mysql_docker创建mysql容器
- 数据库的面试题集_MySQL 面试题_MySQL面试_MySQL 的题集
- MySQL的学习资源:github,官方资料,书籍,大神博客,优秀公众号,学习网站,专栏,文章
- mysql知识:数据库设计,mysql存储引擎,mysql索引优化,mysql错误日志,mysql复制
- 数据库事务总结
MySQL 监控 第01期:Prometheus+Grafana 监控 MySQL
以下文章来源于悦专栏 ,作者马听
这一节内容来聊聊通过 Prometheus 获取 MySQL 的监控数据,并通过 Grafana 展示的过程。首先来看整体架构图:
1 架构图

如上图,通过 mysql_exporter 获取 MySQL 的监控数据,通过 node_exporter 获得 Linux 服务器的监控数据。将获得的监控数据传到 Prometheus 中,最终通过 Grafana 展示出来,效果如下图:
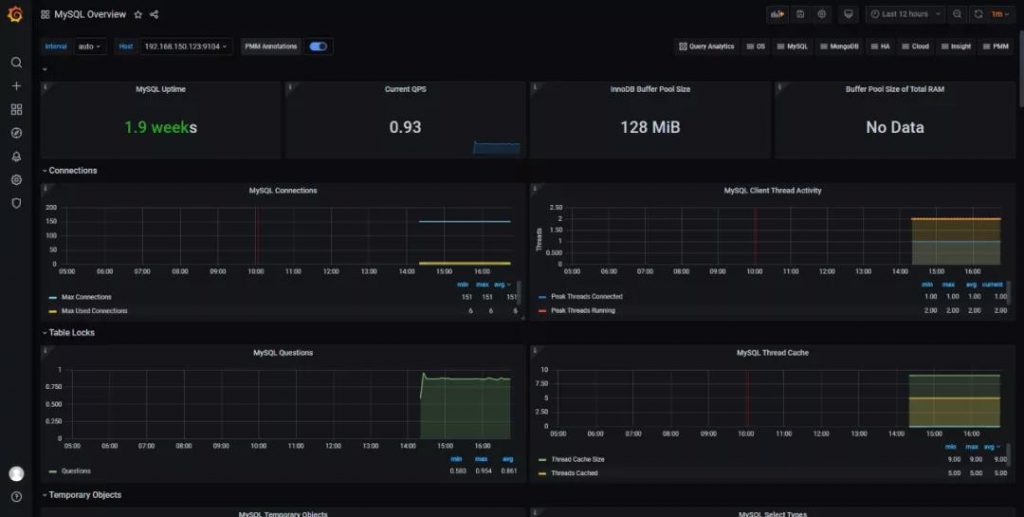
除了展示监控数据,在文章的最后也会增加邮件告警的配置。
2 实验环境介绍
实验环境大致如下:
- 被监控的 MySQL 机器:192.168.150.123(MySQL 版本:8.0.22);
- Prometheus 服务器:192.168.150.253(Prometheus 版本:2.25.2);
- Grafana 服务器:192.168.21.126(Grafana 版本:7.4.5);
- 服务器版本均为:CentOS 7.4;
- 防火墙、Selinux 均关闭。
3 部署 Prometheus
在 https://prometheus.io/download/ 中下载对应的版本。
解压 Prometheus 安装包
tar zxvf prometheus-2.25.2.linux-amd64.tar.gz -C /opt创建软链接
ln -s /opt/prometheus-2.25.2.linux-amd64/ /opt/prometheus 修改配置文件 /opt/prometheus/prometheus.yml
# my global config global: scrape_interval: 15s # Set the scrape interval to every 15 seconds. Default is every 1 minute. evaluation_interval: 15s # Evaluate rules every 15 seconds. The default is every 1 minute. # scrape_timeout is set to the global default (10s). # Alertmanager configuration alerting: alertmanagers: - static_configs: - targets: # - alertmanager:9093 # Load rules once and periodically evaluate them according to the global 'evaluation_interval'. rule_files: # - "first_rules.yml" # - "second_rules.yml"# A scrape configuration containing exactly one endpoint to scrape: # Here it's Prometheus itself. scrape_configs: # The job name is added as a label `job=` to any timeseries scraped from this config. - job_name: 'prometheus' # metrics_path defaults to '/metrics' # scheme defaults to 'http'. static_configs: - targets: ['192.168.150.253:9090']
这里只对 scrape_configs(被监控机器的配置) 中的 static_configs 进行了修改,targets 中的内容改成了 prometheus 所在机器的 IP 加端口。也就是暂时配置只监控本机。
启动 Prometheus
nohup /opt/prometheus/prometheus config.file=/opt/prometheus/prometheus.yml & 访问 Prometheus 页面:http://192.168.150.253:9090/可以看到如下界面:
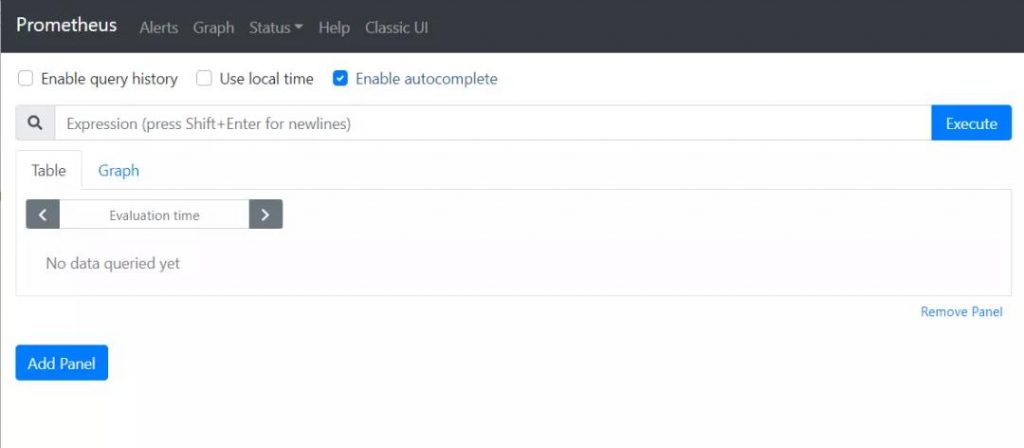
点击 Status –> Targets,可以看到被监控的目标机器,如下:
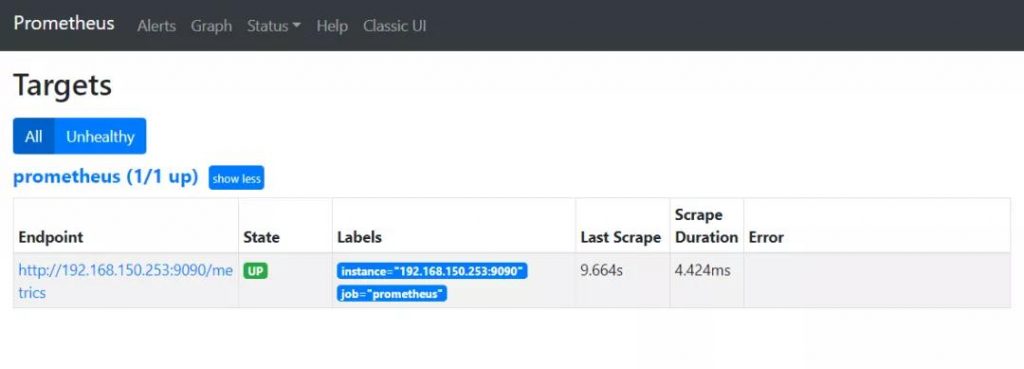
点击对应的 Endpoint,则可获得监控数据,如下图:

到这里,Prometheus 已经部署完成。
4 部署 node_exporter 组件
node_exporter 是 Prometheus 用户获取 Linux 指标的插件。Github 地址:https://github.com/prometheus/node_exporter。这里聊聊它的部署。
首先在 https://prometheus.io/download/ 中找到对应的 node_exporter 版本。

将 node_exporter 传到需要监控的 MySQL 机器上,进行解压:
tar zxvf node_exporter-1.1.2.linux-amd64.tar.gz -C /opt/ 创建软链接:
ln -s /opt/node_exporter-1.1.2.linux-amd64/ /opt/node_exporter 启动
nohup /opt/node_exporter/node_exporter & 浏览器输入:http://192.168.150.123:9100/metrics,如果有类似如下数据,则表示 node_exporter 部署完成。

5 部署 mysqld_exporter 组件
mysqld_exporter 是 Prometheus 的 MySQL 指标导出插件。Github 地址:https://github.com/prometheus/mysqld_exporter。这里来聊聊它的部署。
首先在 https://github.com/prometheus/mysqld_exporter/releases 中找到对应的 mysqld_exporter 版本。
将 mysqld_exporter 传到需要监控的 MySQL 机器上,进行解压:
tar zxvf mysqld_exporter-0.12.1.linux-amd64.tar.gz -C /opt 创建软链接
ln -s /opt/mysqld_exporter-0.12.1.linux-amd64/ /opt/mysqld_exporter 在 MySQL 上创建监控用户
 create user 'exporter'@'localhost'  IDENTIFIED BY 'eXpIHB666QWE!';

 GRANT SELECT, PROCESS, SUPER, REPLICATION CLIENT, RELOAD ON *.* TO 'exporter'@'localhost';
新建一个配置文件:
vim /opt/mysqld_exporter/mysqld_exporter.cnf 配置 MySQL 监控用户信息:
[client]
user=exporter
password=eXpIHB666QWE!
启动 mysqld_exporter
nohup /opt/mysqld_exporter/mysqld_exporter --config.my-cnf=/opt/mysqld_expor浏览器输入:http://192.168.150.123:9104/metrics,可获得 MySQL 监控数据,如下图(部分数据):

6 配置 Prometheus 获取监控数据
在 prometheus 的机器上,修改 prometheus 的配置文件 /opt/prometheus/prometheus.yml,增加 node_exporter 和 mysqld_exporter 的配置:
# my global config
global:
  scrape_interval:     15s # Set the scrape interval to every 15 seconds. Default is every 1 minute.
  evaluation_interval: 15s # Evaluate rules every 15 seconds. The default is every 1 minute.
  # scrape_timeout is set to the global default (10s).

# Alertmanager configuration
alerting:
  alertmanagers:
  - static_configs:
    - targets:
      # - alertmanager:9093

# Load rules once and periodically evaluate them according to the global 'evaluation_interval'.
rule_files:
  # - "first_rules.yml"
  # - "second_rules.yml"

# A scrape configuration containing exactly one endpoint to scrape:
# Here it's Prometheus itself.
scrape_configs:
  # The job name is added as a label `job=<job_name>` to any timeseries scraped from this config.
  - job_name: 'prometheus'

    # metrics_path defaults to '/metrics'
    # scheme defaults to 'http'.

    static_configs:
    - targets: ['192.168.150.253:9090']
  - job_name: 'mysql-123'
    static_configs:
    - targets: ['192.168.150.123:9104']
  - job_name: 'node-123'
    static_configs:
    - targets: ['192.168.150.123:9100']
重启 prometheus
pkill prometheus
nohup /opt/prometheus/prometheus --config.file=/opt/prometheus/prometheus.yml &
访问 Prometheus 页面:http://192.168.150.253:9090/,点击 Status –> Targets,可以看到新增加的被监控节点。
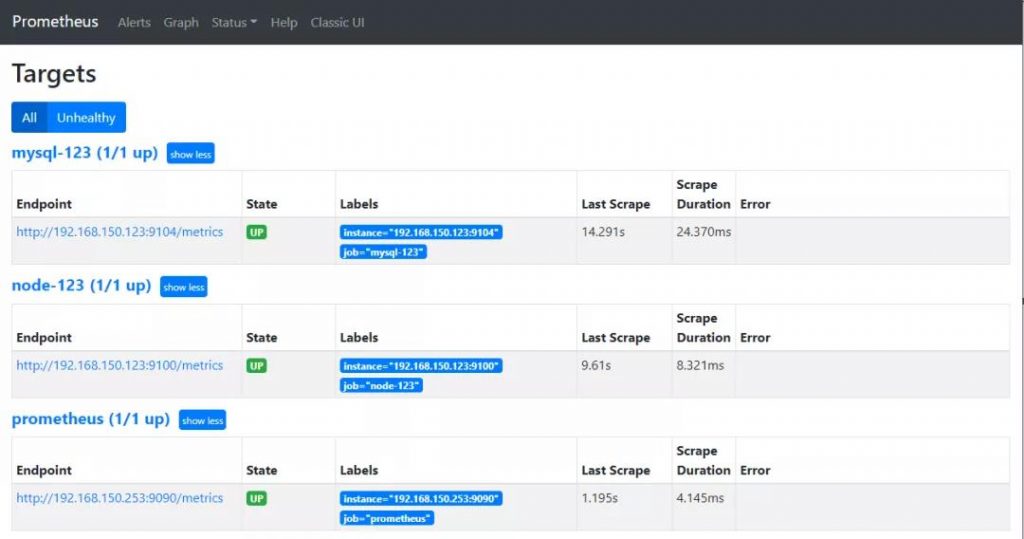
回到主界面,搜索 MySQL 相关参数,比如:innodb_buffer_pool_size:
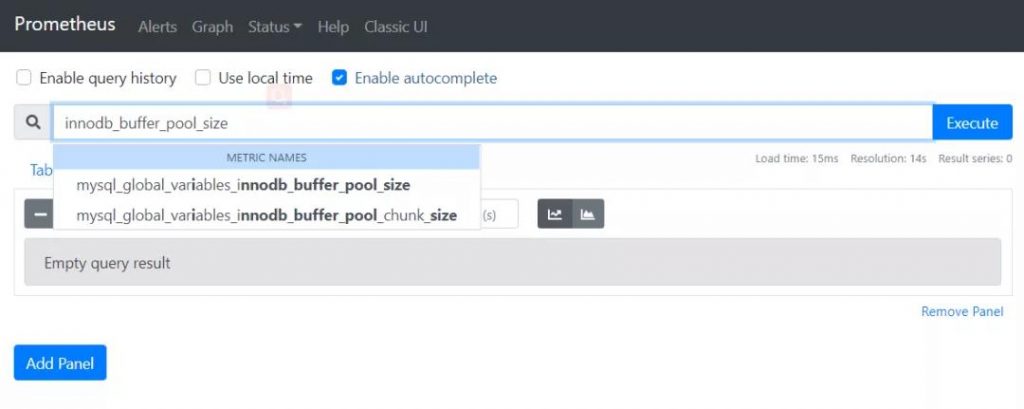
选择对应的参数,则可看到监控图,如下:
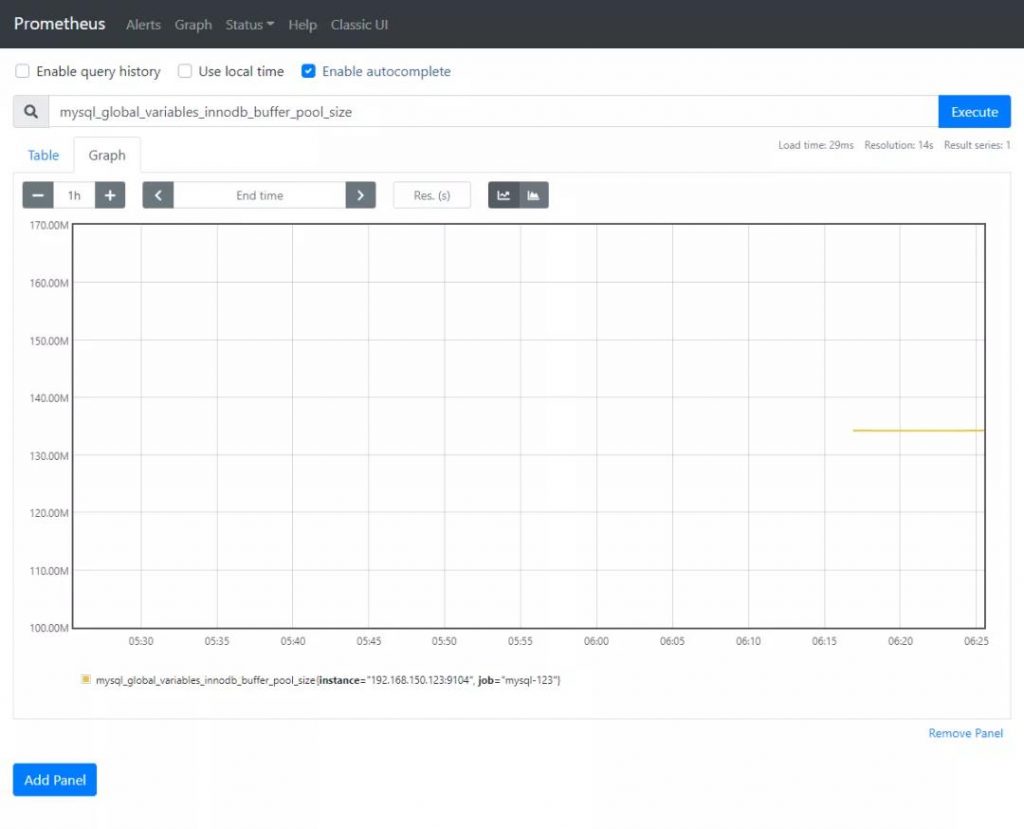
7 部署 Grafana
Grafana 的 Github 地址:https://github.com/grafana/grafana。
可以在 https://grafana.com/grafana/download 中选择适合自己操作系统的包。然后下载对应的包,如下:
wget https://dl.grafana.com/oss/release/grafana-7.4.5-1.x86_64.rpm
yum install grafana-7.4.5-1.x86_64.rpm -y
启动 Grafana
systemctl start grafana-server.service登录 Grafana WEB 界面:http://192.168.21.126:3000/,显示如下:

用户名密码都是 admin。登录后,会让我们修改密码,则按提示操作即可,当然也可以点击跳过。
这里就可以看到 Grafana 的主界面了:
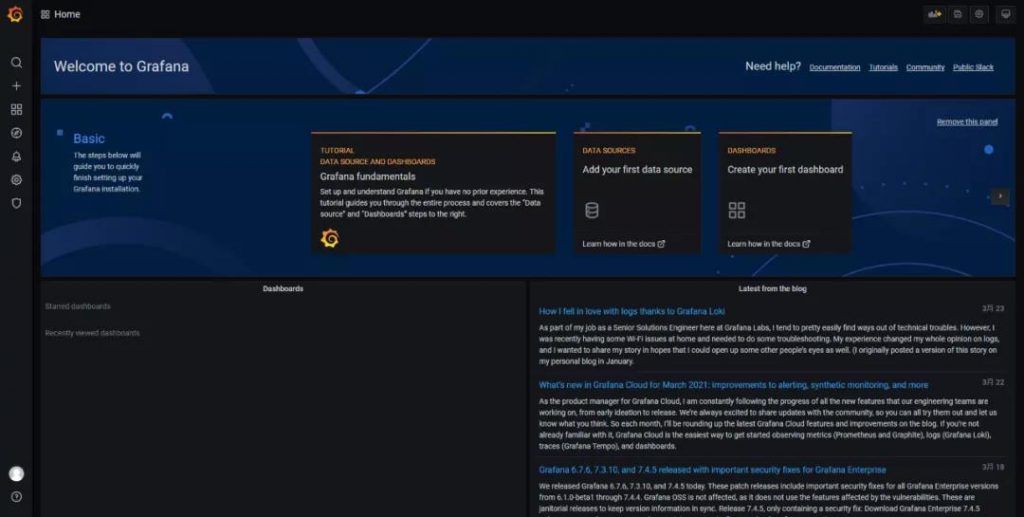
8 为 Grafana 配置 Prometheus 数据源
按下图进入数据源添加界面:
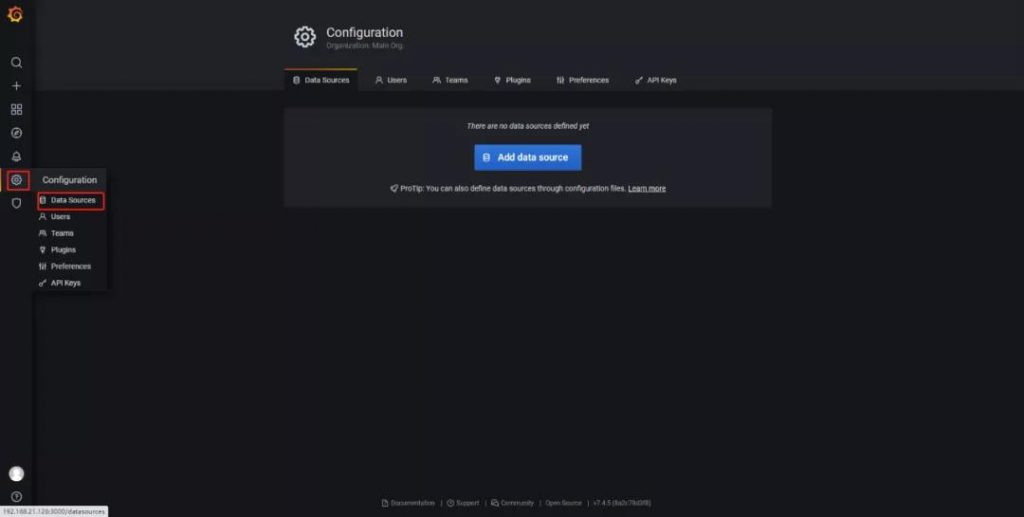
点击 “Add data source”
如下图,选择“Prometheus”数据源:
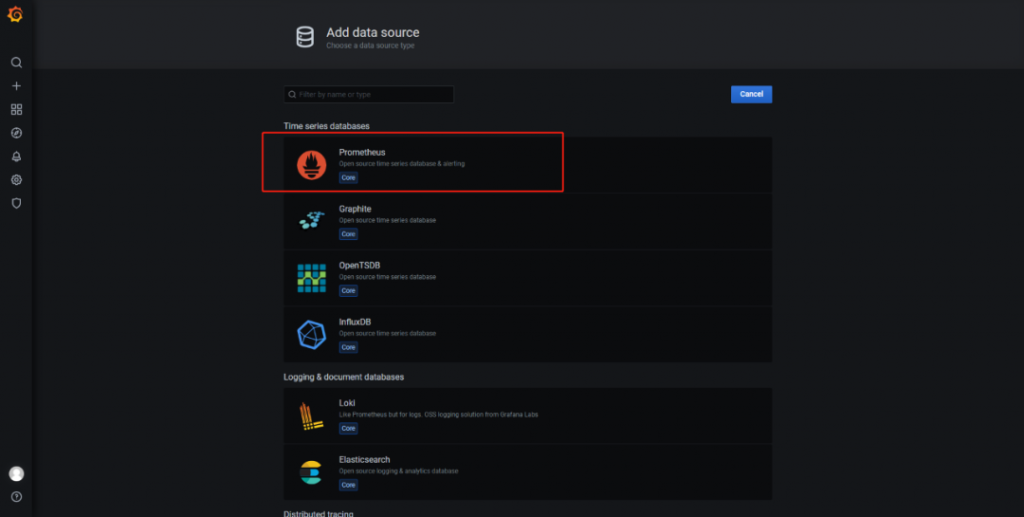
如下图,增加 Prometheus 的 URL 即可:

点击最下方的 Save & Test,显示“Data source is working”,则表示数据源配置正常:

9 Grafana 展示 Linux 的监控数据
按照下图的方式进入模板导入界面:

在 “Import via grafana.com” 下方输入:11074

点击 Load 会出现如下界面:

将 Name 改成你希望定义的名字,在 VictoriaMetrics 位置选择之前创建的 Prometheus 数据源,如下图:

点击 “Import”,会自动跳转到如下界面:
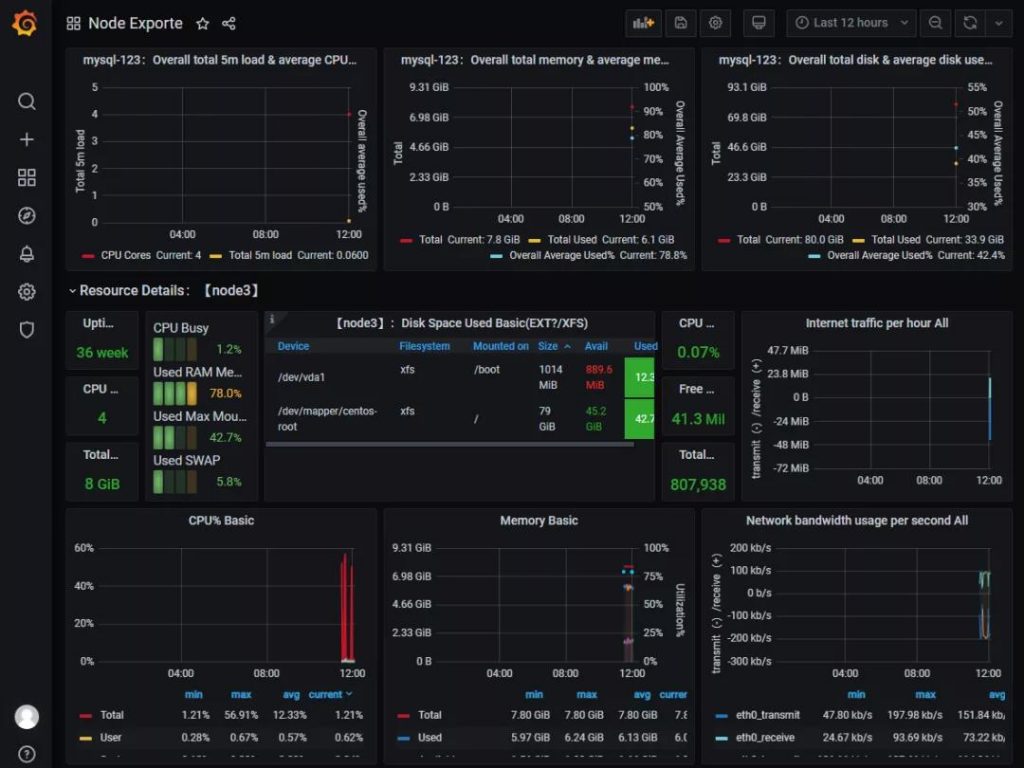
到这里,完成了 Grafana 展示 Prometheus 中 Linux 操作系统的监控数据。
10 Grafana 展示 MySQL 的监控数据
按照下图的方式进入模板导入界面:

在 “Import via grafana.com” 下方输入 7362:

或者在 https://grafana.com/grafana/dashboards/7362 页面下载 JSON 模板,然后点击 “Upload JSON file” 导入,然后会显示如下信息(目前还有其他一些模板,比如 https://github.com/percona/grafana-dashboards,有兴趣的可以尝试一下):

在 prometheus 选项选择之前创建的 Prometheus 数据源,点击 “Import”,会自动跳转到如下界面:
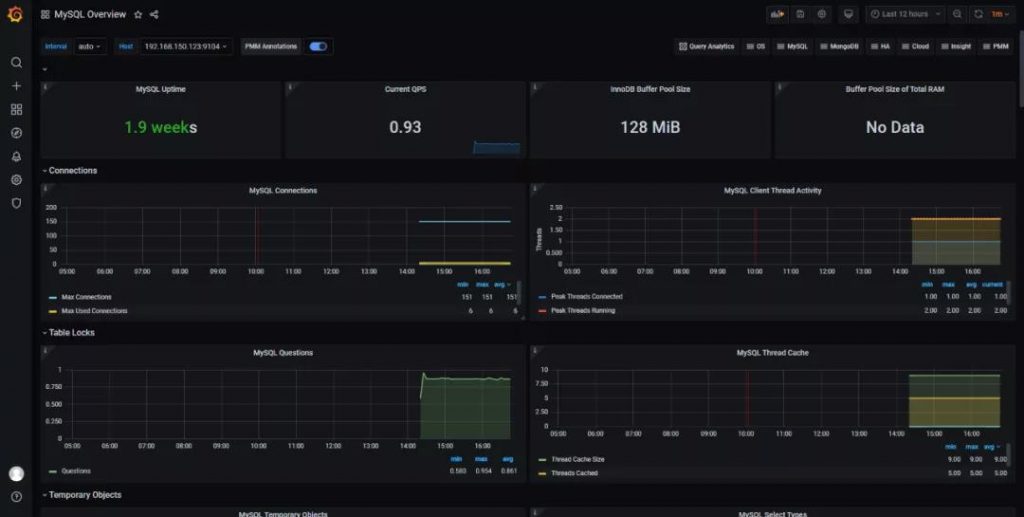
到这里,完成了 Grafana 展示 Prometheus 中 MySQL 的监控数据。
11 告警配置
对 Prometheus 中获取的数据进行告警配置,目前有很多方式,比如:
- 通过 Grafana 配置邮件告警
- 通过开源的运维告警中心消息转发系统:PrometheusAlert,Github 地址:https://github.com/pandorasongs/PrometheusAlert。
- 等等
本节内容就拿 Grafana 配置邮件告警来举例,PrometheusAlert 在后面的内容中再跟朋友们介绍。编辑 Grafana 配置文件 /etc/grafana/grafana.ini,按下图修改 [smtp] 部分配置:

重启 Grafana
systemctl start grafana-server.service按如下方式进入通知渠道创建界面
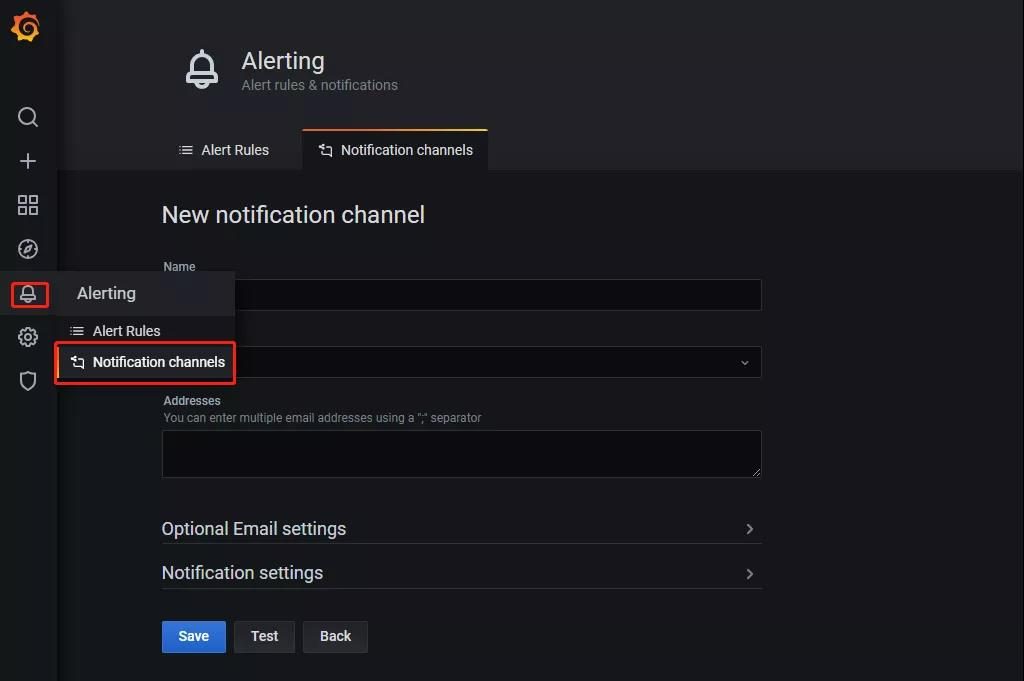
填写好收件人,点击 “Test”,如果能正常收到邮件,则说明配置正常。
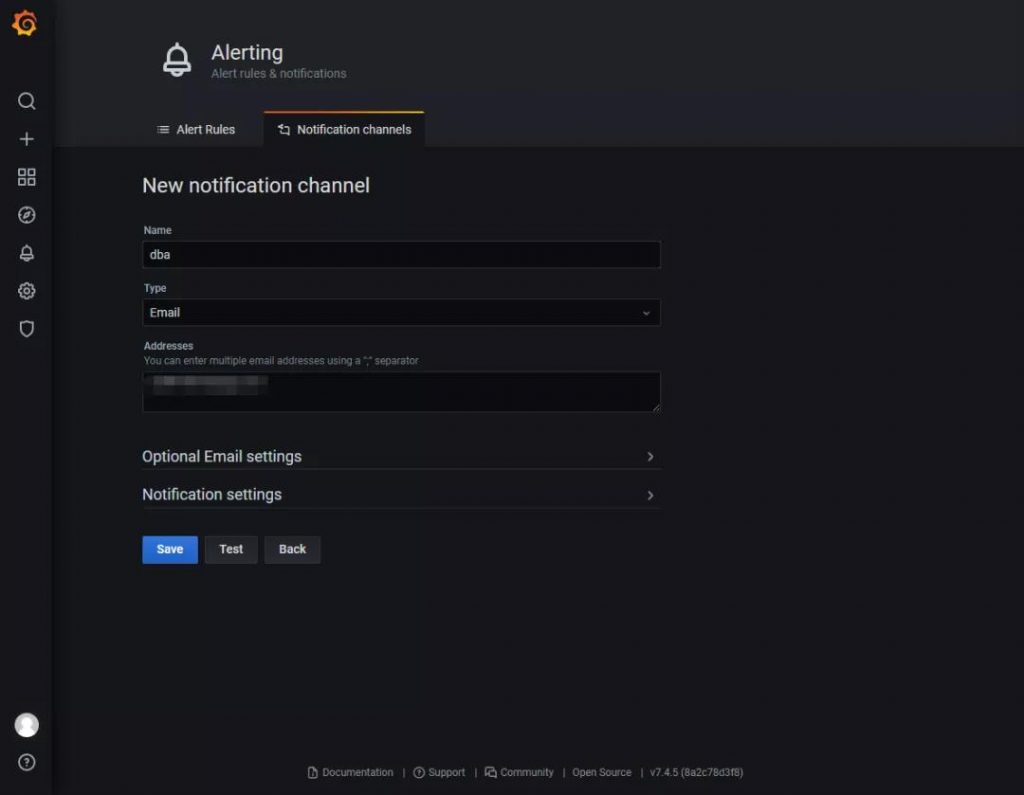
如果测试正常,则点击“Save”保存配置。
12 告警测试
在前面导入的 MySQL Overview 中,选择一个监控项,点击 More–>Duplicate 再复制一个图出来:

对复制出来的图点击 Edit,如下图:

则进入下图:
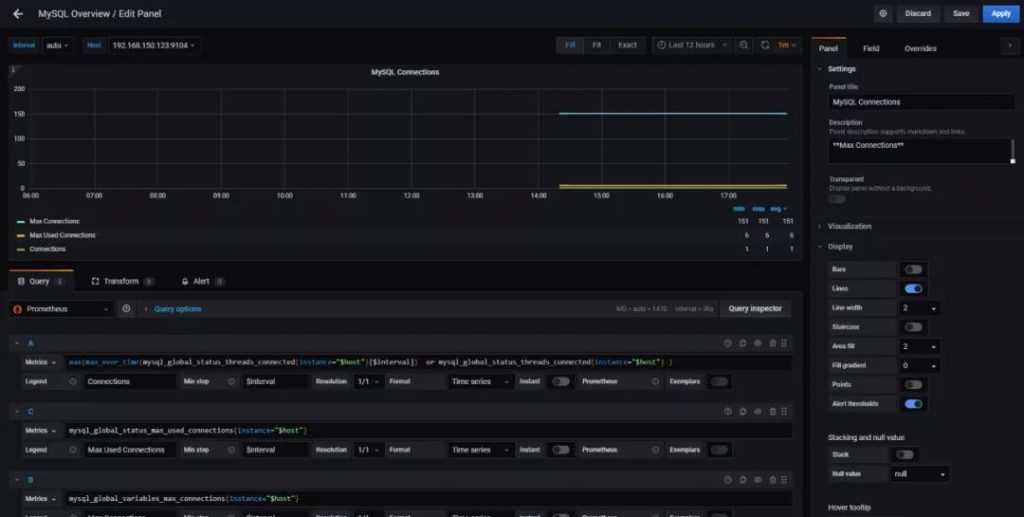
将里面的变量都改为常量,如下图:

进入 Alert,再点击 Create Alert,进入如下界面:
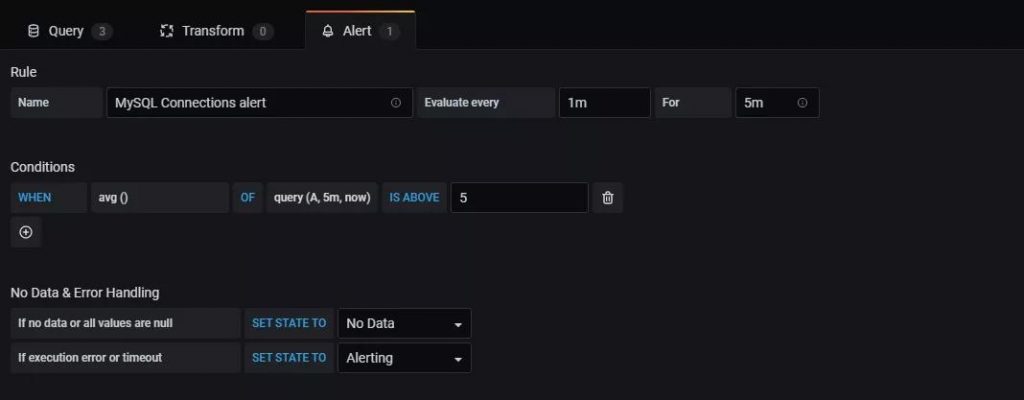
这里解释一下 query(A,5m,now) IS ABOVE 5:
- A 对 A 类(A 是 Query 中定义的)指标;
- 5m,now 表示从 5 分钟前到现在;
- IS ABOVE 5 定义阈值的类型和阈值。
更多内容可参考:https://grafana.com/docs/grafana/latest/alerting/create-alerts/
并填下好下方的收件人和 Message:

其中,收件人“dba”就是我们在 12.3.11 步骤配置的收件人。
配置好之后,点击下面的 “Test rule”,如果出现以下界面,则表示触发器配置正常:

因为上面我们是对 mysql_global_status_threads_connected 设置的阈值,所以我们可以在测试的 MySQL 中,构造超过 5 个连接,测试是否可以邮件告警。
如下图,就是告警效果:

到这里,通过 Prometheus + Grafana 监控 MySQL 的内容就讲完了。


评论区(0)